How to Add Text to a Photo
Short answer
On iPhone, open the photo in Photos, tap Edit and Markup, tap Add to add text, then tap Done and Done again. The second Done finishes the Photos edit.
On Android, open the photo in Google Photos, tap Edit, Markup and Text. Finish with Checkmark, then choose Save or Save as copy. Save as copy keeps the original untouched.

Before you start
Have the photo on your phone and decide what the words need to say. Use Photos with Markup on iPhone, or the Google Photos app on Android. A short label can give a product photo a price, a date or an offer.
Google says most photo-editing features need at least 3 GB of RAM and Android 8.0 and up. Some features are only available on Pixel. Those are Google Photos requirements, not limits for Apple’s Markup route.
Our suggestion: write the exact words before opening the editor. Keep the subject clear and choose text that you can read on a phone screen without zooming.
On iPhone: Photos Markup
Markup adds text to a photo through the Photos editing controls. Follow this route from the photo you want to change.
Step 1: open the photo and tap Edit
Go to Photos and select the photo you want. Tap Edit. You are now editing that photo rather than starting with a separate design.
Look at the empty space around the subject before adding words. If the background is distracting, see blurring a photo background.
Step 2: tap Markup, then Add
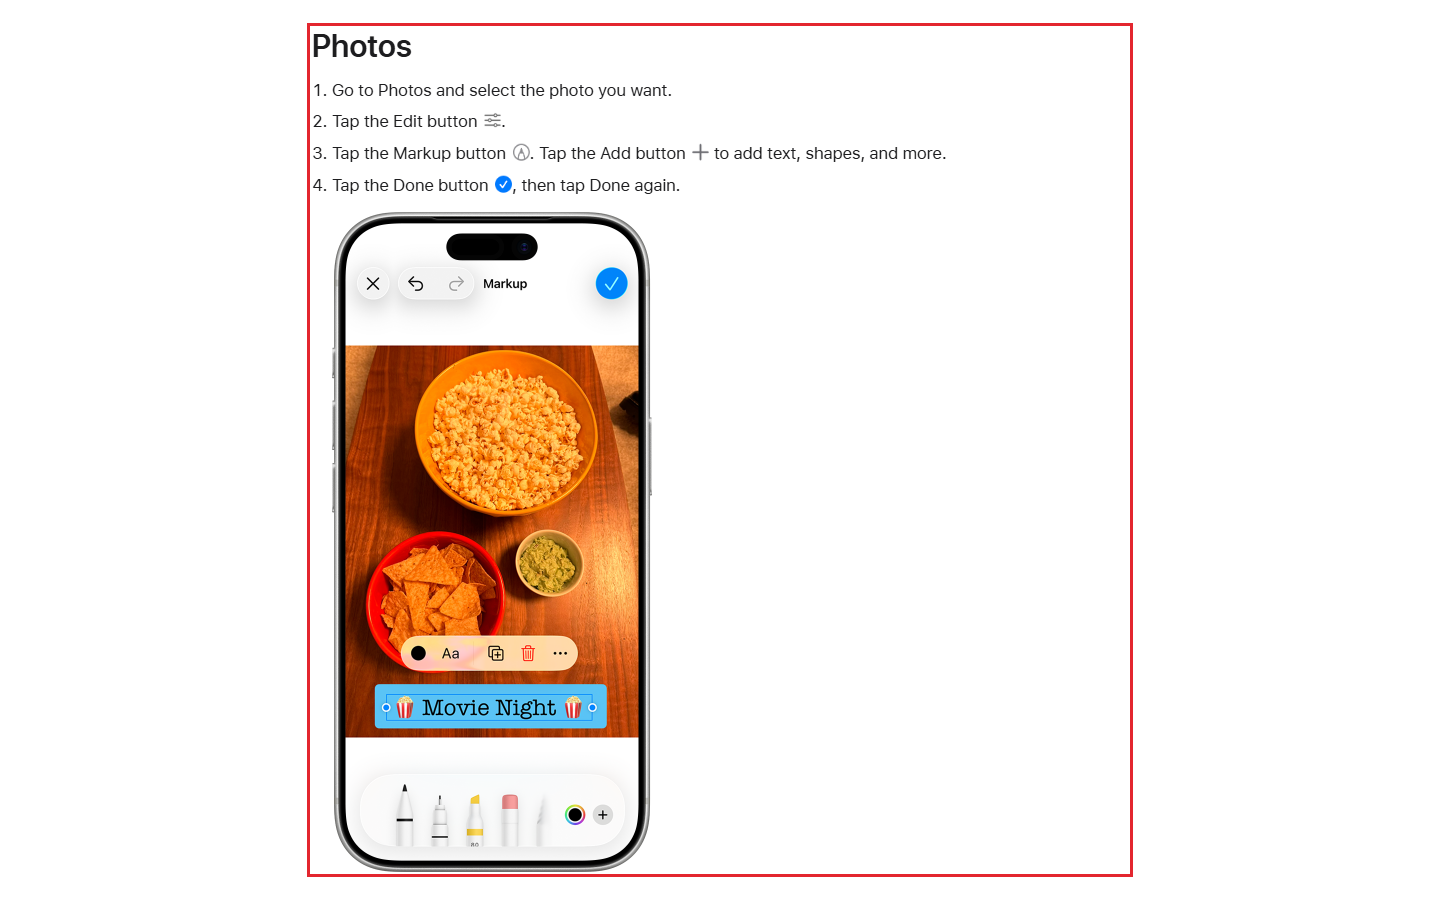
Tap the Markup button. Tap Add to add text, shapes and other markup. Choose the text option for the words you want on the photo.
(Our suggestion) Tap the text box, type your own words, then drag it into clear space beside the subject.
Keep the wording focused on the information the viewer needs. A product name and a short message may be enough; avoid covering the product with a long sentence.
Step 3: change the text
Tap the circle to choose a different text color. Use the formatting button to change the font, size and alignment. If a change goes wrong while editing, the Undo button can undo any markup action.
Our suggestion: compare the words with the light and dark parts of the photo behind them. Try a simpler color and a larger size before adding more decoration.
Step 4: tap Done, then Done again
Tap Done to finish Markup, then tap Done again in Photos. Open the finished photo and review the wording. Check spelling and any offer details before sharing it.
For a cover image with more elements around the photo, see making a YouTube thumbnail.
- open the photo in Photos
- tap Edit and Markup
- tap Add to add text
- tap Done and Done again
On Android: Google Photos
Google Photos has text controls under Markup. The Android route also gives you a choice between changing the original and making a copy.
- Open the Google Photos app on your Android device.
- Open the photo you want to edit.
- At the bottom, tap Edit, then Markup. Alternatively, tap Edit, Tools, then Markup.
- Tap Text to add text on top of the photo.
- Swipe through fonts, adjust alignment, or add a background fill or outline to the text.
- To move the text box, touch and hold it, then drag.
- When finished, tap Checkmark.
- Choose Save to update the original, or Save as copy to make a new photo.
Save as copy keeps the original untouched. To undo changes to a photo saved in place, tap Edit, then Revert. Google says you cannot undo or adjust changes to photos saved as a copy.
| Phone and app | Where to start | Text options | Save | Undo |
|---|---|---|---|---|
| iPhone Photos | Edit, Markup, Add | Color, font, size, alignment | Done, then Done again | Undo button while editing |
| Android Google Photos | Edit, Markup, Text; or Edit, Tools, Markup | Fonts, alignment, background fill, outline; move text box | Save updates original; Save as copy keeps it | Edit, Revert for edits saved in place; copy changes cannot be undone |
Source: Apple and Google, read 5 November 2026.
If the result needs another edit
If a markup step goes wrong on iPhone, use the Undo button.
If the words are hard to read, choose a larger size or a different color on iPhone. In Google Photos, try a background fill or outline.
If an Android tool is missing, check Google’s requirements: most features need at least 3 GB RAM and Android 8.0 and up. Some features are Pixel-only.
If you need the original again, open the photo you kept with Save as copy. The changes inside a saved copy cannot be undone or adjusted.
Our example: a bakery photo announcement
Our example (illustrative, not a real client).
Sunrise Loaf Bakery has a cake photo for a weekend announcement. The proposed text gives the picture a clear purpose without covering the cake.
- Words (our suggestion, made-up price and day): “Chocolate cake $24, this Friday only”.
- Place (our suggestion): clear counter space to the right of the cake.
- Android style (our suggestion): white text with a dark background fill.
- iPhone style (our suggestion): white text at a larger size.
- Save choice (our suggestion): Android Save as copy; iPhone Done, then Done again.
- Phone-size check (our suggestion): read the offer at the size customers will see before sharing.
Frequently asked questions
Which Android save option keeps the original?
Save as copy makes a new photo and keeps the original untouched. The changes inside that copy cannot be undone or adjusted.
How do I save text added on iPhone?
Tap Done in Markup, then tap Done again in Photos.
Can I move the text in Google Photos?
Yes. Touch and hold the text box, then drag it. Google also lists fonts, alignment, background fill and outline options.
Sources
Maker instructions read 5 November 2026.
Published · Updated