Free 3D Assets for Video: Downloads and a Real Overlay Test
Read the quick answer, then follow the five steps.

Contents
Quick answer: free animated elements for your video
Download a free green-screen clip from a creator page such as anoerone or Pixabay, read its licence, place the clip on a track above your footage, and remove the green with a chroma key filter.
We tested this with a free trophy clip from anoerone. We downloaded it, laid it over our own car clip in a browser tool, and removed the green. This is the result.
About the reel's pack
The reel says 300+ assets. Its original pack, publisher and licence remain unidentified. The collection below is a separate Microsoft alternative, with its own licence and clearly stated limits.
Download 397 animated 3D overlays
Get a ready-to-use collection of animated 3D emoji from Microsoft Fluent Emoji. We selected 397 different source animations and made green-screen MP4 copies. The pack includes a searchable preview index, a CSV file list and Microsoft's MIT licence.
Download the MP4 pack
Get all 397 green-screen MP4 clips (ZIP, 33.8 MB). Extract the ZIP, then open START-HERE.html to browse the previews. No paid download is needed.
- Native size: 256 x 256 pixels. Use these as small overlays, not full-screen HD or 4K footage.
- Style: colourful 3D emoji and stickers. They are different from the realistic objects shown in the reel.
- Playback: silent clips of different lengths. Repeat a clip in your editor when you need a longer shot.
- Checks: all 397 source files matched Microsoft's file hashes. All 397 MP4s decoded without errors and contained moving frames.
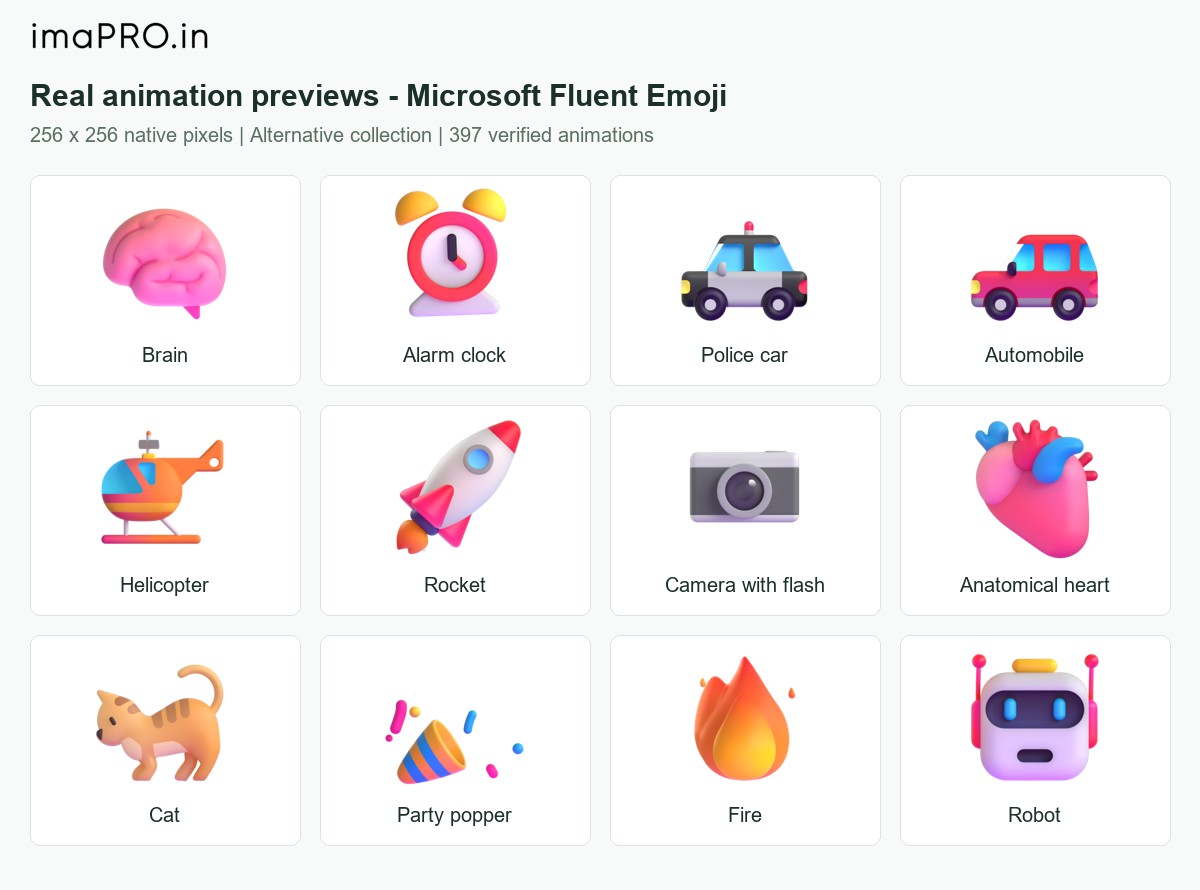
Use an overlay from the pack
Pick a clip in the preview index, then add it above your main footage in your video editor.
- Use chroma key and select
#00FF00green. Adjust the edges and green spill while checking the object. - Keep the overlay small so its native 256-pixel image stays clear. Export a short test before finishing your video.
- If a subject has green parts, a green key may remove some of them. Try a transparent APNG in an editor that supports it, or choose a different clip.
- The official Microsoft repository has the transparent animated PNG originals. Editor support for APNG varies.
Licence: Microsoft's MIT licence allows use, changes and redistribution under its terms. Keep the included MICROSOFT-LICENSE.txt with redistributed copies. The transparent originals and MP4 versions represent the same animations; they are not counted twice.
Free clips and icons we looked at
Each row is one page.
| Page | What it is | Animated or still | Licence and credit | Status |
|---|---|---|---|---|
| anoerone trophy loop | A rotating trophy on a green background, MP4 | Animated | Free for personal and commercial use. No attribution required. | Tested here |
| Pixabay alarm clock | An alarm clock ringing on a green screen | Animated | Pixabay Content License. Credit is welcome and not required. | Not tested |
| Pixabay rotating clock | A rotating clock on a green screen | Animated | Pixabay Content License. Credit is welcome and not required. | Not tested |
| Vecteezy gold coin | A spinning gold coin on a green background | Animated | Free licence, attribution required. Link the free licence from the page. | Not tested. The preview is watermarked, which means a faint mark sits over the picture. |
| Mirin's LIVE lettering | Rotating 3D LIVE lettering, green MP4 | Animated | The terms allow free commercial and non-commercial use and make credit optional. They do not allow reposting the files or giving them away in other collections. | Not tested |
| 3dicons | 120 unique icons and 1440 rendered images | Still images | CC0, free for commercial and personal use | Not tested. The PNG pack is on Gumroad, an online shop, and we did not confirm that it is free. |
Pixabay says only its full Content License is legally binding. Pixabay says it is your responsibility to check the licence, so read it on the page you download from.
How the browser method works
The playground is a web page that runs FFmpeg, a free video tool, without any installation. It has a file list, a box for the tool's settings, and a Run button. The settings are called arguments. They are a list of short instructions, such as which files to read and what to do to each one.
You do not need to write them. You paste our tested list into the box and press Run.
Words used in this guide
These are the plain meanings of the terms you will meet below.
| Word | Plain meaning |
|---|---|
| Green-screen clip | A video on a clean green background, ready for keying. |
| Chroma key, or keying | A filter that removes one colour, here green, so the video underneath shows through. |
| Despill | A filter that removes the green tint left on the edges. |
| Overlay | Placing one video on top of another. |
| Track | A layer in a video editor. A clip on a higher track sits on top of the clips below it. |
| Credit | Naming the creator when you use their work. |
| Playground | The web page where you run the steps below. It works without any installation. |
Step 1: Check the creator's licence
Start on the creator's page.
- Open the trophy page.
- Find the line about free personal and commercial use.
What you should see: the line “Free for personal and commercial use. No attribution required.” The page also says the footage has a clean green background, ready for chroma key compositing.
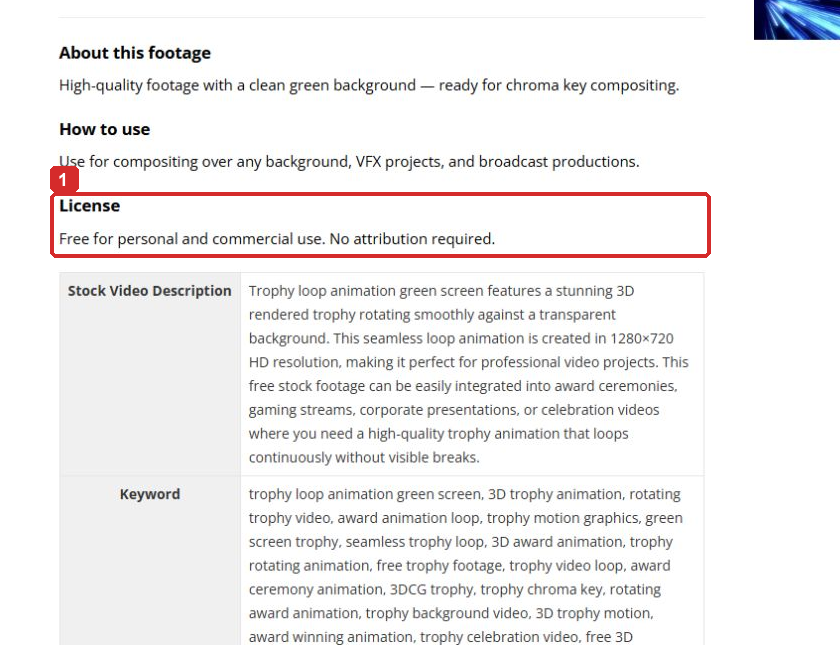
The page text mentions a transparent background. The MP4 we downloaded has a solid green one instead, so it needs keying.
Step 2: Download the trophy
Stay on the same page.
- Scroll down the same page to the file box.
- Click “Download”. It is a normal browser download.
What you should see: a file named 030.mp4 in your downloads folder. Ours is 1280 by 720 pixels at 30 fps and about 10 seconds long.
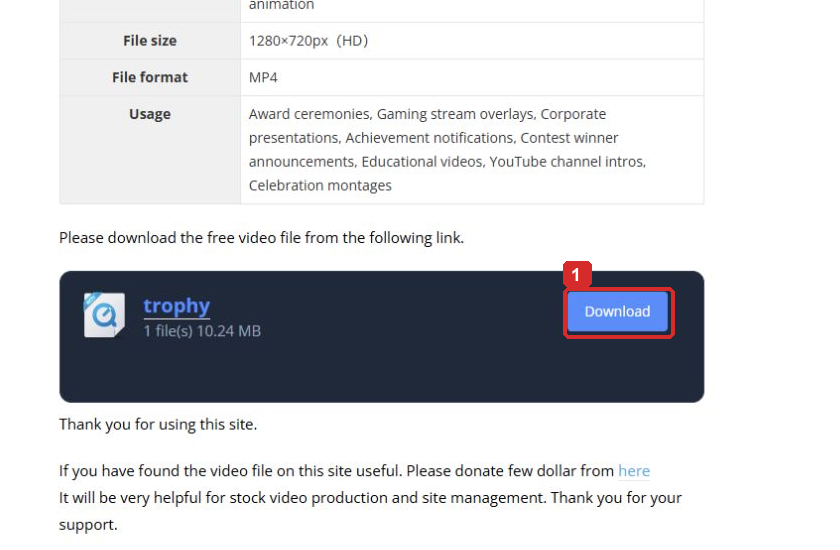
Get the file from the creator's page yourself.
Step 3: Upload the trophy and your video in the playground
Next, open the browser tool.
- Open the ffmpeg.wasm playground.
- In the “File System” panel, click the upload icon. Choose
030.mp4. - Upload your background video the same way. To repeat our test, download our car clip, a file named
two-car-patrol-replacement.mp4.
Check that both files appear in the file list before you go on.
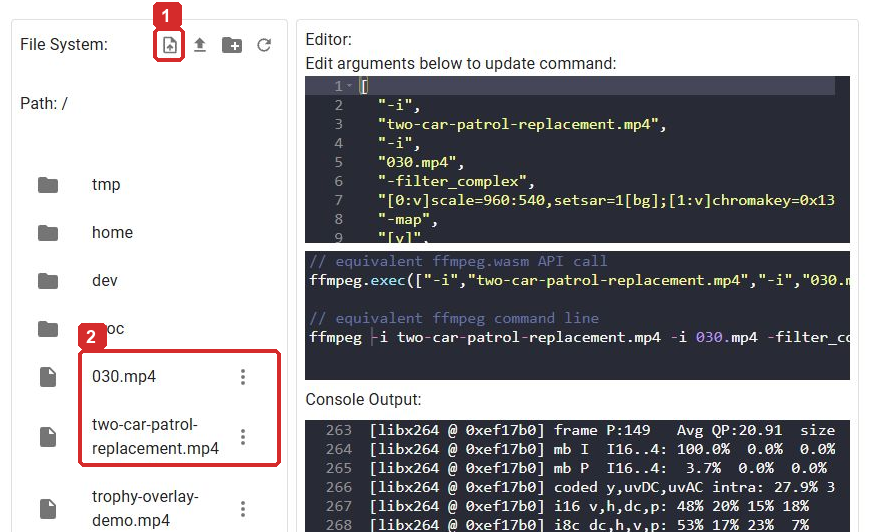
The playground page says it lets you try ffmpeg.wasm without any installation. Ignore its Quick Start list. That list is a sample that converts an AVI file to an MP4 file.
Step 4: Paste our tested arguments and click Run
This is the copy and paste step.
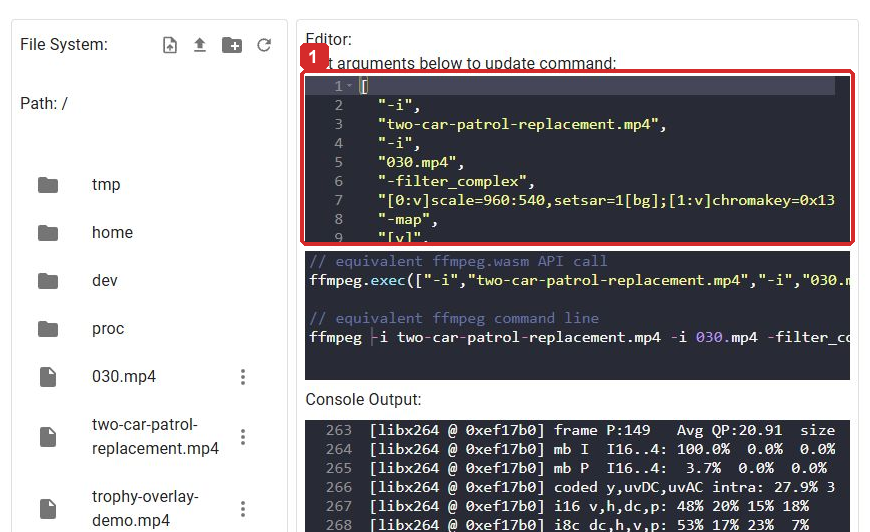
- Click inside the box under “Edit arguments below to update command”.
- Select everything in the box and delete it.
- Paste the list below.
- Click the blue “Run” button in the workspace. Do not use the Quick Start button.
If your background file has another name, change the first file name in the list to match.
[
  "-i",
  "two-car-patrol-replacement.mp4",
  "-i",
  "030.mp4",
  "-filter_complex",
  "[0:v]scale=960:540,setsar=1[bg];[1:v]chromakey=0x13ff08:0.24:0.04,despill=type=green,scale=320:180[fg];[bg][fg]overlay=W-w-24:24:shortest=1,format=yuv420p[v]",
  "-map",
  "[v]",
  "-t",
  "5",
  "-r",
  "30",
  "-c:v",
  "libx264",
  "-preset",
  "ultrafast",
  "-crf",
  "22",
  "-an",
  "trophy-overlay-final.mp4"
]
What the list does
In plain words, the list does four things.
- It scales the background video to 960 by 540.
- It removes the colour 0x13ff08, a bright green, using a similarity of 0.24 and a blend of 0.04, which are settings of the key filter. Then it removes leftover green from the edges and scales the trophy to 320 by 180.
- It places the trophy 24 pixels in from the top and right edges.
- It keeps the first 5 seconds, writes 30 frames per second, and leaves out the sound. Leave the other settings as they are.
After you click Run, a progress bar fills. Do not count a full progress bar as proof that it worked. In our test the log then ended with the line “Aborted()”, and the output file still played. Do not treat that line as proof either way. Judge the run only by the output file in the next step.
Step 5: Download the output and check the MP4
Last, save the result and play it.
- Find the file named
trophy-overlay-final.mp4in the file list. - Click the three-dot menu next to it, then click “Download”.
- Open the downloaded file in a video player and play all 5 seconds.
What you should see: a silent video, 5 seconds long, with the trophy in the upper right corner over the car clip and no green around its edges.
Treat the run as failed if the file is missing, will not play, stops early or still shows green. Then check that the output name in the list is trophy-overlay-final.mp4, that your background file name matches the first name in the list, and that you pasted the list without changes. Run it again after that.
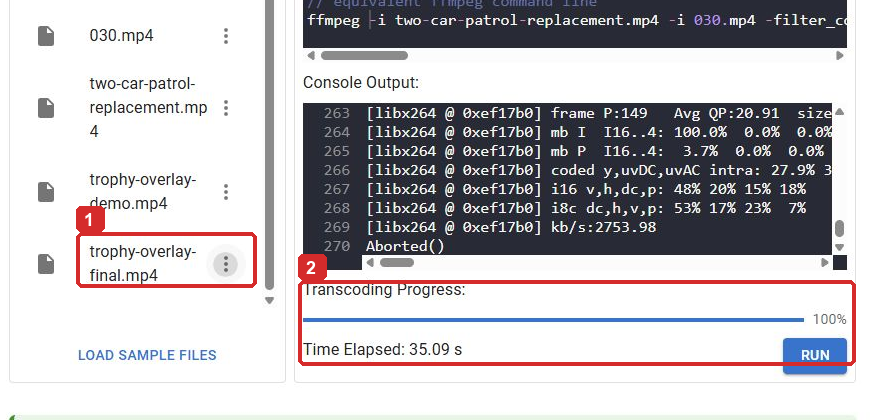
Our file is 960 by 540 pixels at 30 fps, runs 5 seconds, and has no sound. We read these figures with FFprobe, a video-reading tool, and looked at the middle frame.
Other tools for the same job
You can also do this on a normal timeline editor. These are the editor's own instructions. Shotcut was not tested for this guide. In Shotcut, the documentation says to put the green-screen clip on any track except V1 and the background on a lower track. Then open Filters, Video, and add “Chroma Key: Simple”. Pick the key colour with the eye dropper, and use Distance to set which shades count as the key colour. The same page says this filter alone may not clear uneven green without affecting other parts, and points to “Chroma Key: Advanced” and the key spill filters.
The wide.video changelog lists a Colorkey filter and clip blend modes. We have not tested that editor.
If something goes wrong
Find your problem in the first column and follow the second column.
| Problem | What to do |
|---|---|
| The log says “Aborted()” | Download the output file and play it. Judge the result by the file. |
| Green edges stay around the trophy | Change the similarity number in small steps and run again. We only tested the numbers shown above. |
| The run fails at once | Check that both file names in the list match the names in the file list. |
| You need a see-through clip, not a green one | Look for a clip in a format that keeps transparency. Our trophy file is a solid green MP4. |
Before you share
- Read the licence again on the page you downloaded from.
- Do not post the raw clip on your own site or give it away in a pack.
- If a page requires credit, as Vecteezy does, add the credit line to your video description.
Advanced and optional: build your own car clip from a free 3D model
This longer route builds your own car clip. It takes more setup than the trophy test.
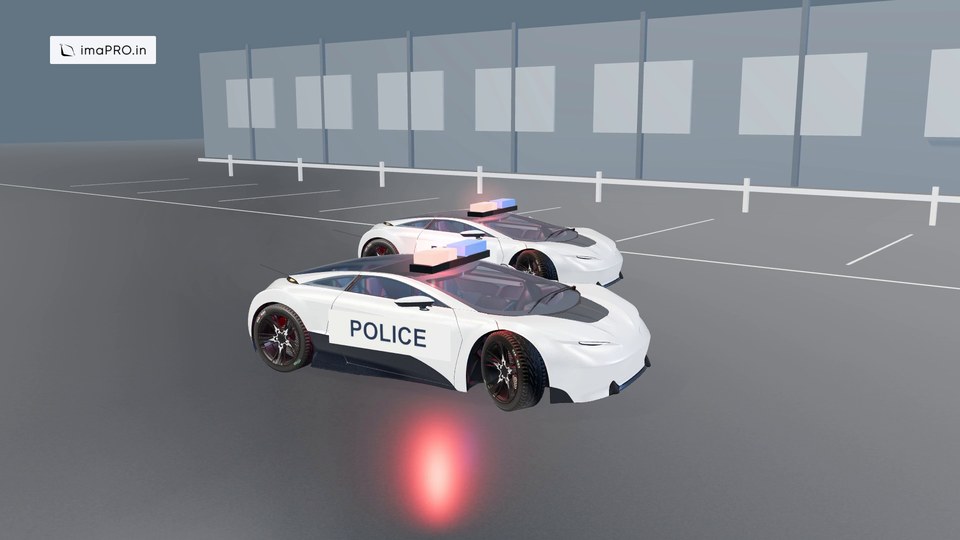
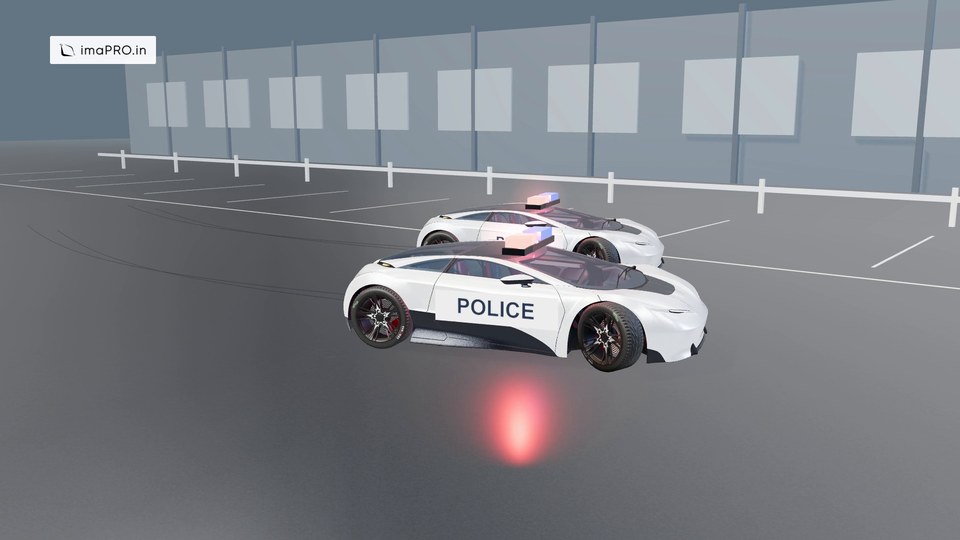
We did this ourselves with Car Concept from the Khronos glTF Sample Assets. The clip below is our own two-car result. It runs 10 seconds at 1920 x 1080 and 30 frames per second, and has no sound.
Download the companion ZIP. It is a file named imapro-two-car-companion.zip that imaPRO made for this guide. It holds the finished video and the editable scene folder.
The model's licence is CC BY 4.0. Watching the sample takes 10 seconds. Opening the scene and rendering your own copy takes longer and depends on your computer. We did not time our render, so we give no figure.
What this clip is, and what it is not
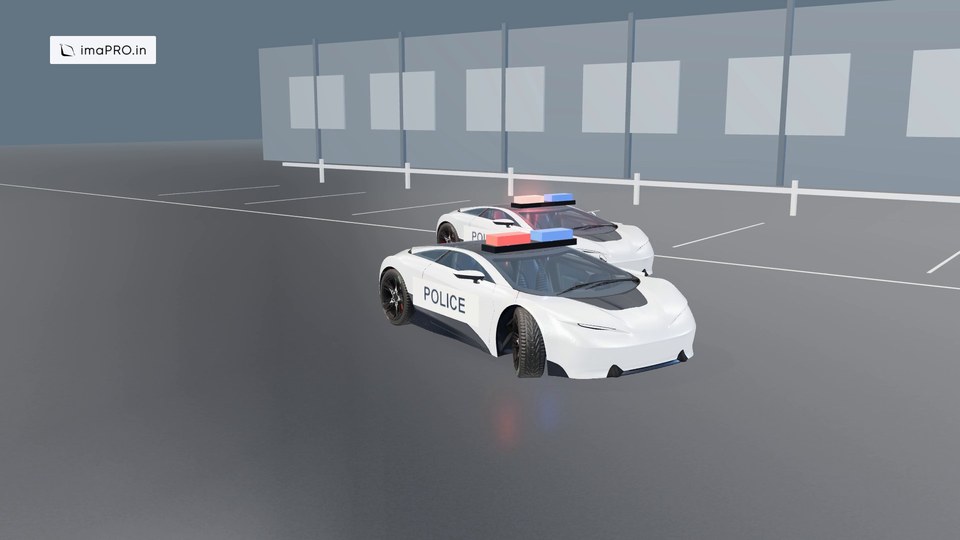
It is an original computer-generated scene that we built. Two generic patrol concept cars drive across a parking lot with flashing roof lights. The picture is opaque, so it is a full shot and not a see-through overlay. We decoded all 300 frames of the finished video.
It is not the ProductionCrate Double Drift clip and it is not live action. It does not match the photo-real look of that reference, and the industrial background is clearly computer made.
Before you start
What you need
- A web browser, to watch the sample. We tested playback in Chrome.
- The companion ZIP, the file
imapro-two-car-companion.zip. It is a file made by imaPRO for this guide, and it holds thefilmscene folder, the MP4, the poster, a preview page and the credits file. - To edit and render, install Node.js 22 or newer and FFmpeg. HyperFrames lists both as requirements. The next table explains these words.
- Be online the first time you run the commands.
What you will have at the end
Your own copy of the scene, a video like our sample, and a credit line to keep with it.
A few words in this guide may be new. Here they are in plain terms.
| Word | What it means here |
|---|---|
| Terminal | A text window where you type a command and read the reply. |
| Command | One line you type in the terminal, such as npm run render. |
| Node.js | A program that runs JavaScript outside a browser. HyperFrames lists it as a requirement. |
| npm and npx | Helper commands that come with Node.js. They run project tools by name. |
| FFmpeg and FFprobe | Video tools. HyperFrames lists FFmpeg as a requirement, and we used FFprobe to read the video's settings. |
| README | A text file that explains a project or a download. |
| GLB | One file that holds a model of an object, with its shape and paint. |
| Render | Turn the scene and the camera view into pictures, then into a video. |
| Opaque | Solid, with nothing see-through. |
| Poster | The still picture shown before a video plays. |
| Textures | The images that paint a model's surface. |
| GitHub | A website where projects share files and notes. The Car Concept page is there. |
| Alpha channel | The see-through part of an image. Our video has none. |
| CG | Computer-generated, meaning drawn by software and not filmed. |
| Three.js | A JavaScript library that draws scenes in a browser. Our scene uses it. |
| HyperFrames | A free, open-source tool that turns HTML pages with animation into MP4 files. We used it to open the scene and preview it. |
| Reel | A short vertical video made for social media. |
| Trademark | A protected brand name or logo. |
| CC BY 4.0 | A free licence. You may reuse the work if you credit the creator, link the licence and say what you changed. |
| Khronos | The group that publishes the glTF Sample Assets models, including Car Concept. |
| fps | Frames per second. Our video plays at 30 fps. |
| h264 and yuv420p | h264 is how our video is compressed. yuv420p is its colour format, which has no see-through part. |
| Composition and timeline | In the HyperFrames workspace, a composition is one scene layout, and the timeline is the bar that shows time. |
| Local web server | A small program on your own computer that hands files to your browser. |
| HeyGen | The company behind HyperFrames. Its name shows in the workspace. |
Advanced step 1: Download a free 3D model and keep the licence
Car Concept sits in the Khronos glTF Sample Assets collection on GitHub.
- Open the Car Concept page. The README opens below the file list. Scroll to the heading “Operations”.
- Click “Download GLB”, marked in red in the picture. The download is one GLB file.
- To follow our exact example, you can skip the download. The companion scene already holds the model at
film/assets/car-concept.glb, a file of 11,778,688 bytes.
What you should see: a single GLB file in your downloads folder. Our copy is 11,778,688 bytes.
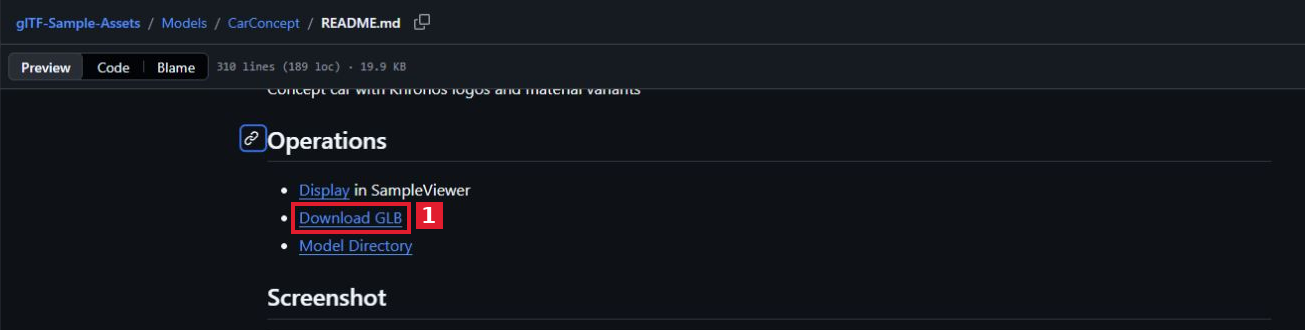
What the licence asks you to do
The Car Concept README names Eric Chadwick as the creator of the model and textures, and Darmstadt Graphics Group GmbH as the copyright holder in 2024. The licence is CC BY 4.0. In plain words:
- Credit the creator, link the licence, and say if you changed the model.
- Do not suggest that the creator backs you or your video.
- Leave out the logos. The licence file says it excludes logos and associated trademarks, and the model carries Khronos logos.
The README says the asset was started from a public domain model, meaning one with no copyright limits. Copy this credit line into your video description:
Car Concept: model and textures by Eric Chadwick, Darmstadt Graphics Group GmbH, 2024.
Source: https://github.com/KhronosGroup/glTF-Sample-Assets/tree/main/Models/CarConcept
Licence: CC BY 4.0 (https://creativecommons.org/licenses/by/4.0/legalcode)
Changes: patrol paint and lettering, roof lights, two vehicle paths, camera animation.
Change the last line to match what you changed.
Where else to look for free 3D models and assets
The table lists what we know about each source.
| Source | Licence | Credit needed? |
|---|---|---|
| Khronos glTF Sample Assets | Car Concept is CC BY 4.0. Check any other model you use | Yes for Car Concept |
| Sketchfab, BlendSwap and similar sites | We did not check their licences. Read each model's licence | Depends on the licence |
Open the LICENSE.md file in a Khronos model folder to see its licence before you use it.
Advanced step 2: Play the two-car sample
Start with the finished result. For this step, open the video in a web browser.
- Download the companion ZIP and extract all the files. Keep the folders together, because
preview.htmlfinds the video by its path. - Open
preview.htmlin Chrome. Press Play, marked in red in the picture, and watch the ten seconds. - To keep the video, click “Download the MP4”, marked 2, or open
two-car-patrol-replacement.mp4directly.
What you should see: both cars on screen. The camera starts at a front three-quarter view and swings toward the side. The roof lights flash red and blue, and the wheels turn. We looked at the video at 1, 3, 5, 7 and 9 seconds to see this.
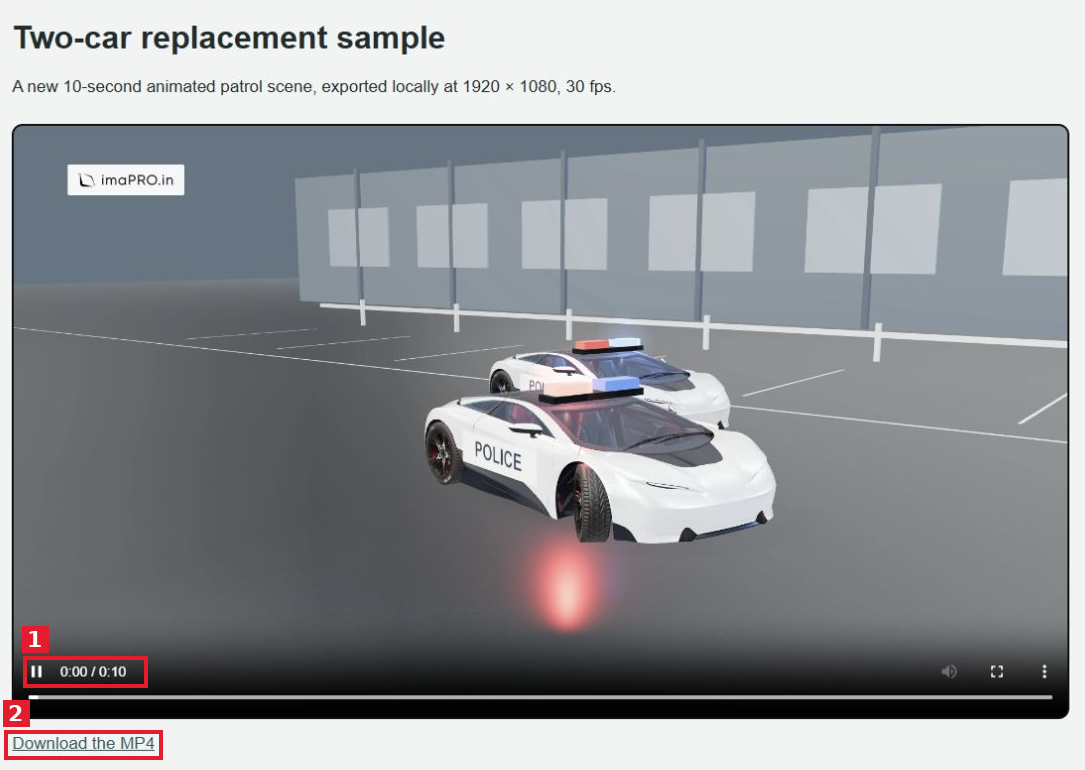
Advanced step 3: Open the editable scene
Our scene builds two cars from the one Car Concept model, and adds the paths, the camera, the lights and the roof lights.
- Check your tools. In a terminal, run
node -v,ffmpeg -versionandffprobe -version. Node.js should print version 22 or higher. If a tool is missing, install it from its own website. The links are in the sources list at the end. - Open a terminal inside the
filmfolder and run the optional environment check, a check of your setup. Fix anything it reports.npx [email protected] doctor - Start the preview and open the project address it prints.
npx [email protected] preview --background - Click “Code”, marked in red in the picture, to see the project files. Click Play, marked 2, to watch the scene.
What you should see: a workspace that shows the cars composition, the scene preview and a ten-second timeline.
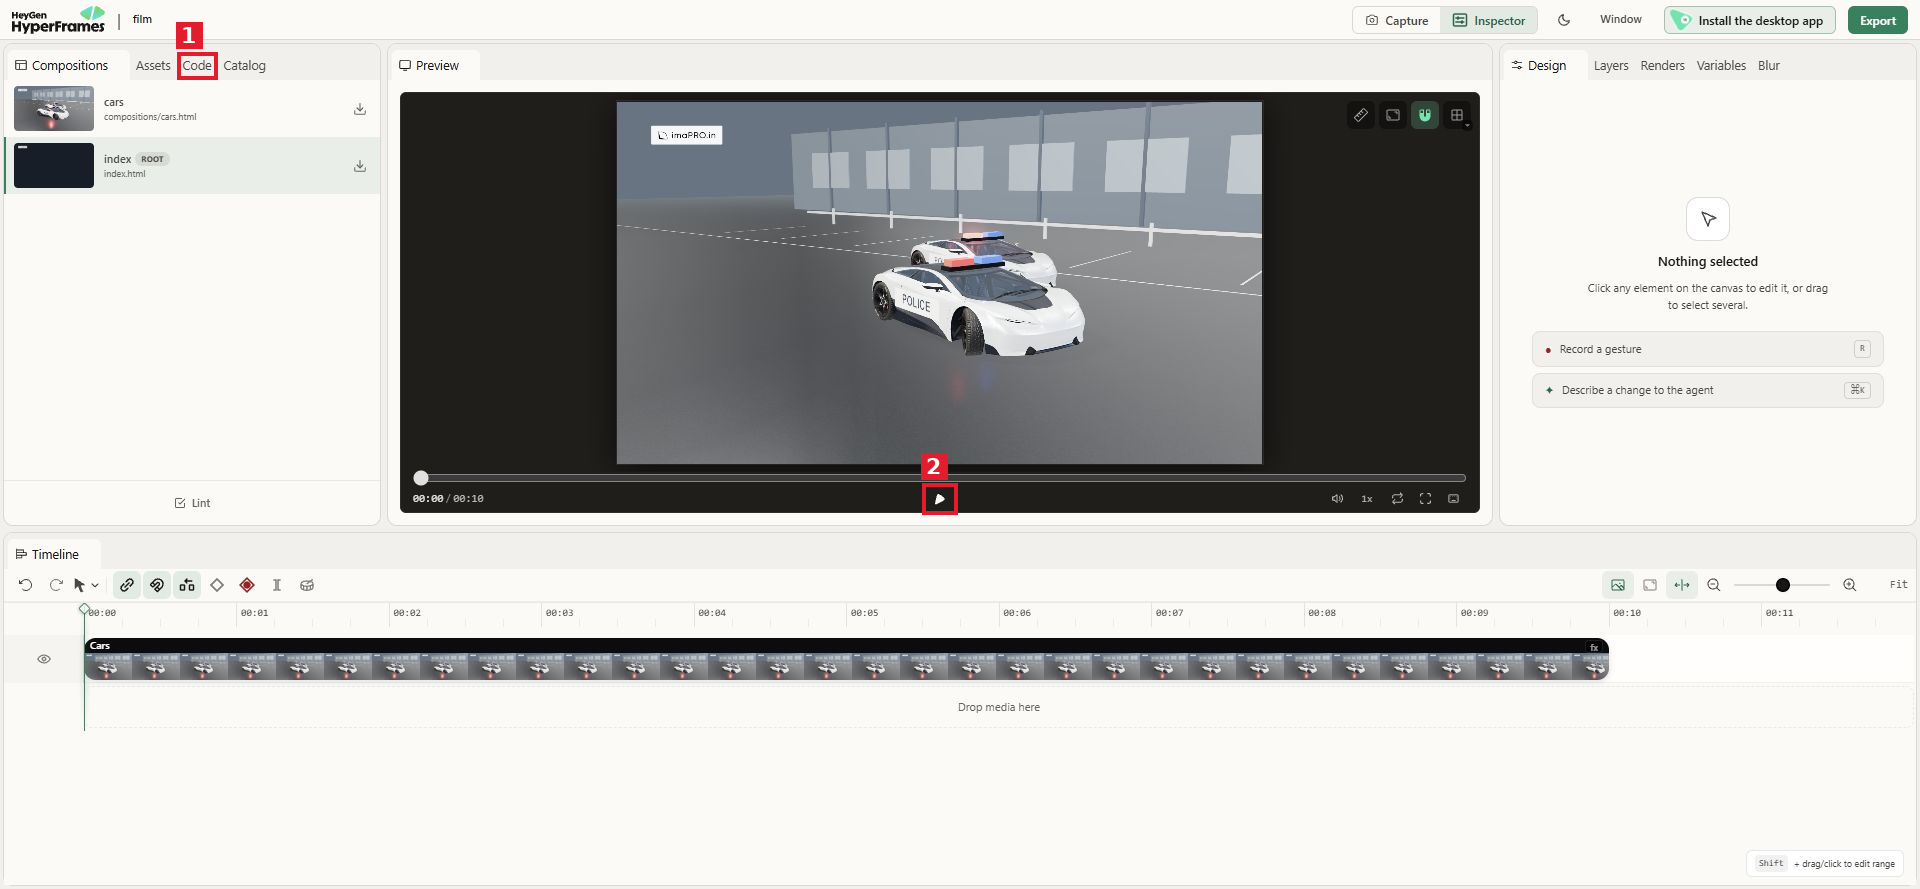
The workspace shows HeyGen branding and an "Install the desktop app" button. HyperFrames runs on your own computer. For this sample we used no paid HeyGen generation, cloud render, purchase or subscription.
About these commands
The HyperFrames README shows preview and render. The doctor check and the --background and --quality options are listed in the HyperFrames command reference. We ran doctor and preview --background on an unchanged copy of the sample, and both worked. We did not finish a render of the project, and we did not run npm run check. If one is rejected, run the same command with --help to see what your copy accepts.
These are the parts of the project you will touch.
| File or folder | What it controls |
|---|---|
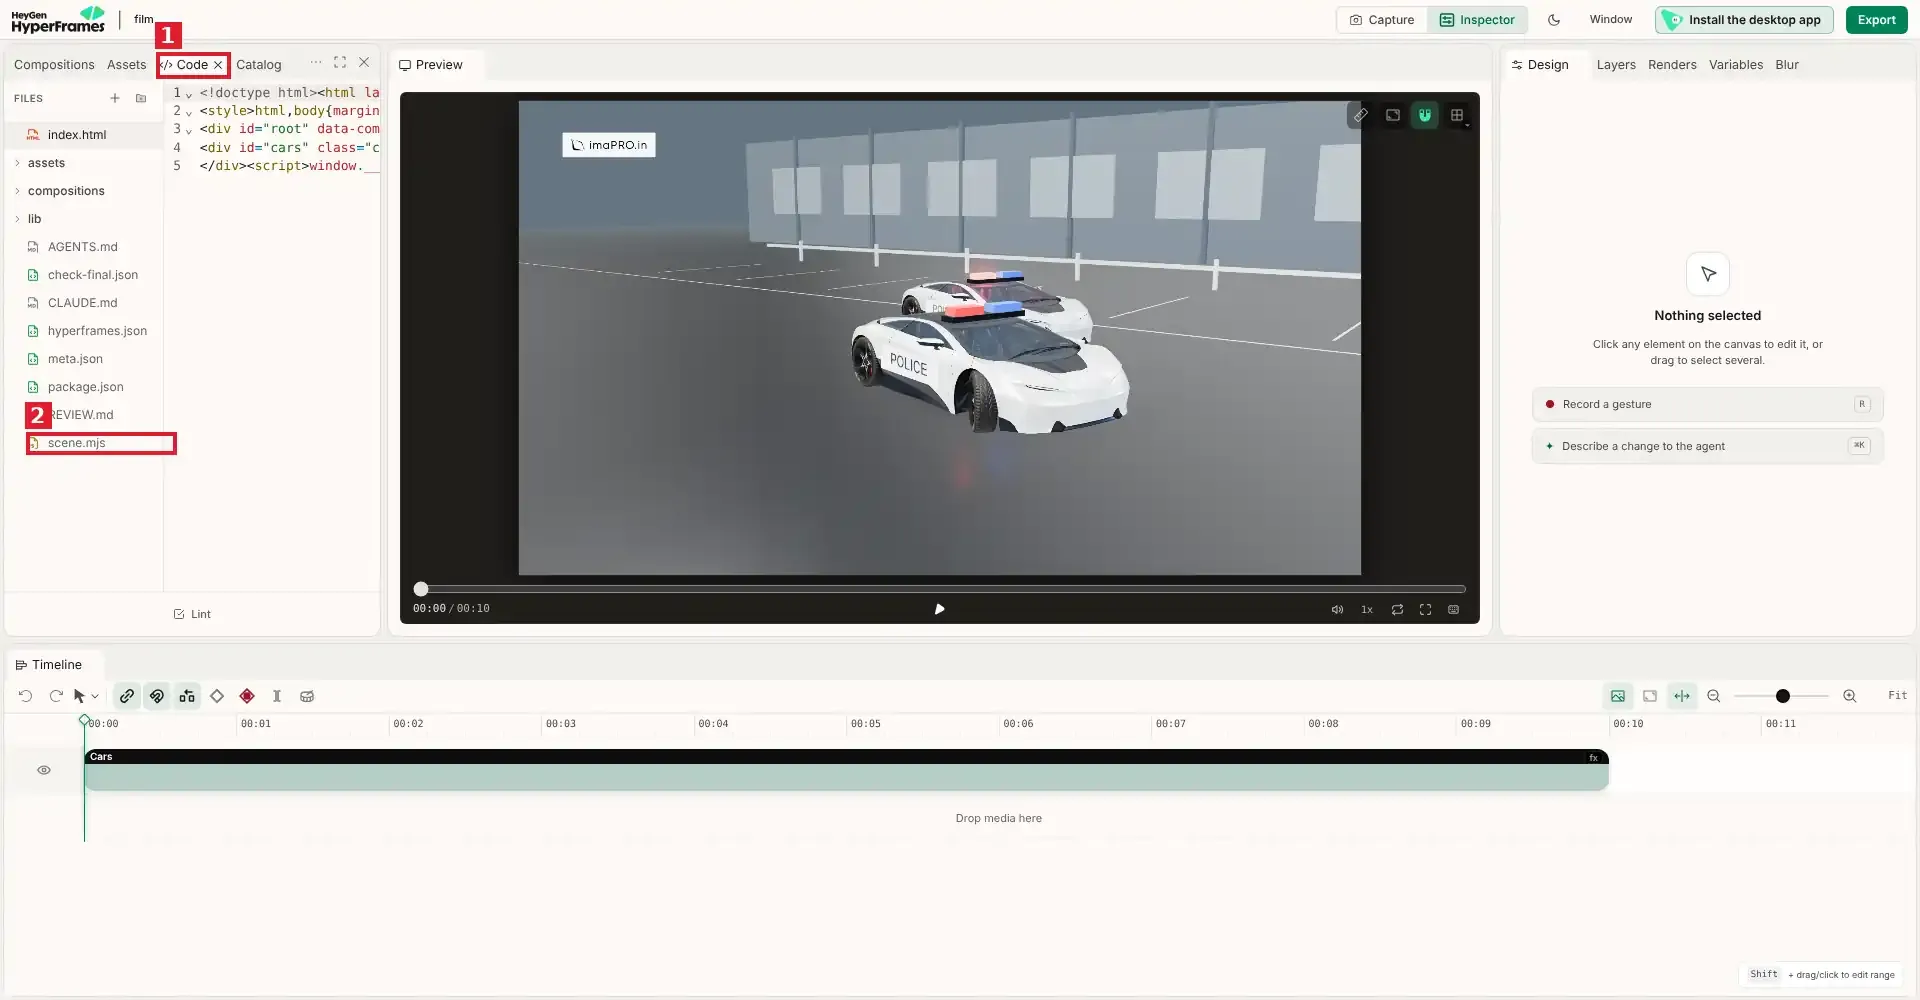
film/scene.mjs | Car paths, camera, lights, materials and wheel motion |
film/compositions/cars.html | The scene canvas and where the company logo sits |
film/assets/ | The GLB and the logo files |
film/lib/ | Three.js and helper scripts, stored locally so the scene needs no download |
Making a free car model look like a patrol car
Car Concept is a plain concept car. Our scene turns it into a generic patrol car with white paint, side lettering and flashing roof lights. Use generic lettering and colours, and do not copy the markings of a real police force.
Where to change things in scene.mjs
Open scene.mjs in any text editor.
Advanced step 4: Check the scene and export the MP4
Run these two commands in a terminal, inside the film folder.
- After any edit, run the project check from the
filmfolder. Fix loading, layout or readability errors before you render.npm run check - Export an MP4. The default is 30 fps. The render saves the MP4 under a name that includes the date and time. For a final copy you can add the quality option
--quality high, which the CLI reference lists.npm run render - Play the exported file. Do not judge the work from the editor preview alone.
The project pins HyperFrames version 0.9.15 in its package.json file, which lists the project's commands. First use may need an internet connection to fetch the tool.
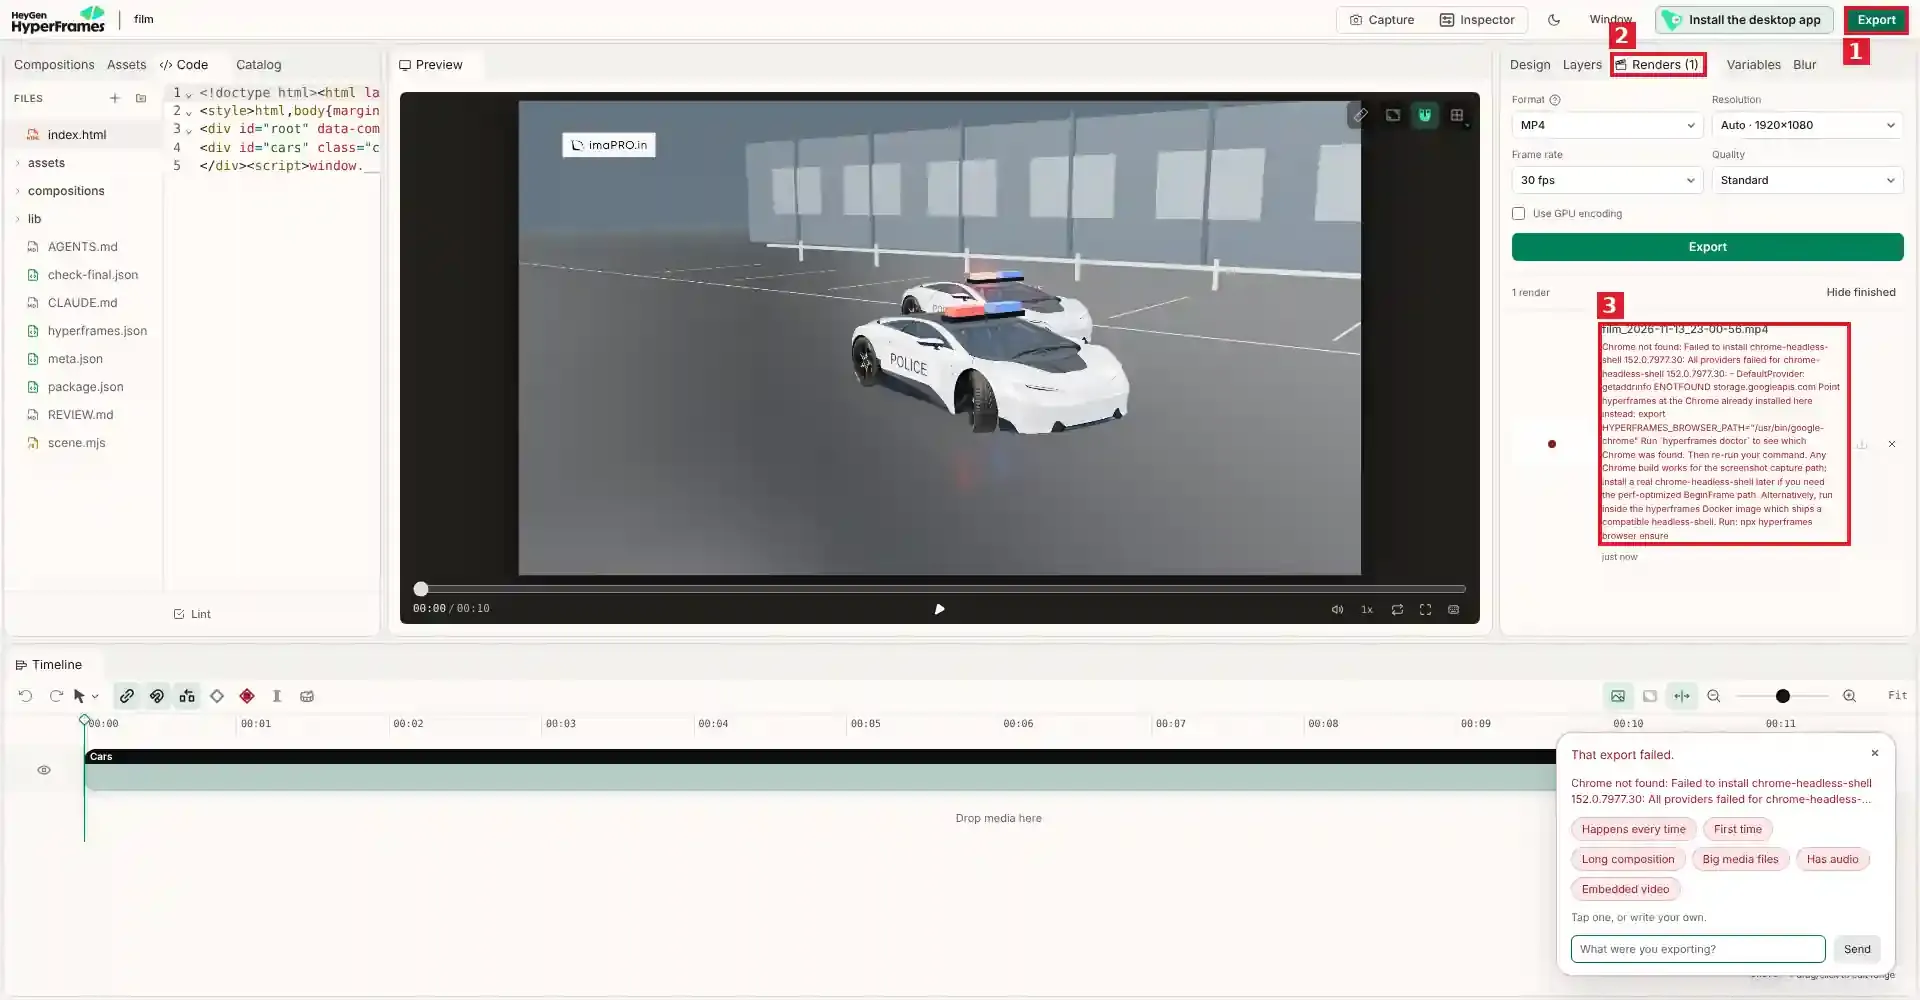
We also tried the Export button in the local workspace. In our test setup it showed an error, because it could not download the browser it wanted. The picture below is that failed attempt. It is not a finished render, and your computer may behave differently.
Check your export
FFprobe reads a video's settings. Run this on your video file:
ffprobe -v error -show_entries stream=codec_name,width,height,pix_fmt,r_frame_rate,nb_frames,duration -of default=nw=1 two-car-patrol-replacement.mp4On our supplied export it printed:
codec_name=h264
width=1920
height=1080
pix_fmt=yuv420p
r_frame_rate=30/1
duration=10.000000
nb_frames=300| Check | Our supplied export |
|---|---|
| Size | 1920 x 1080 |
| Speed | 30 frames per second |
| Length | 10.0 seconds |
| Frames decoded | 300 |
| File size | 13,475,350 bytes |
| Audio | None |
| Transparency | None, the picture is opaque |
Look at the first frame, a middle frame and the last frame. Both cars should be whole, the wheels should touch the ground, and the camera framing should hold.
Use the finished car clip in your edit
Now put the finished video into your own edit.
- Import the video into your editor and place it on the timeline. It is a full shot and not a transparent car overlay.
- Trim it and add sound if you want any. The sample has no narration, music or sound effects.
- For a vertical reel, crop and move the shot on purpose so neither car is cut off.
- Export your edit and play it from start to finish.
Before you share
- Put the credit line, the licence link and your list of changes in the description.
- Play the final video file, not only a thumbnail.
- Call the clip an original CG scene, not live footage and not a transparent overlay.
- If others need the editable files, share the companion ZIP.
Fix common problems
Find your problem in the first column and follow the second column.
| Problem | What to do |
|---|---|
preview.html shows a black box | Extract every file and keep the folders together. The page loads the video and the poster from the same folder. |
| The scene stays blank when you double-click a project file | Serve the film folder with a local web server, or open it through the HyperFrames preview command from the earlier step. |
npx hangs or fails | Check that you are online, then run the command again. |
| The environment check reports a missing tool | Install Node.js 22 or newer and FFmpeg, then run the check again. |
| Export says Chrome was not found | Our test showed this message. It said to set HYPERFRAMES_BROWSER_PATH to the path of the Chrome already on your computer, and to run hyperframes doctor to see which Chrome was found. We did not try this fix. |
| Khronos logos show in your render | The logos are trademarks and sit outside the licence. Hide those plates, as the scene does. |
| You need a see-through background | This video cannot do that, because it is opaque. You would need a different render that keeps transparency. |
| A car is cut off in a vertical edit | Reframe the shot by hand and check the first, middle and last frames. |
Frequently asked questions
Can I use the trophy clip in a video that earns money?
The trophy page says the clip is free for personal and commercial use, with no attribution required.
Is this the 300+ asset pack from the reel?
No. The original pack, its publisher and its licence remain unidentified. This guide now includes a separate collection of 397 Microsoft Fluent Emoji animations, converted to green-screen MP4. They are 256 x 256 pixels and have a different style from the reel.
Are green-screen clips see-through files?
The trophy file is an MP4 with a solid green background. You remove the green with a chroma key filter. It is not a see-through file.
Can I put the trophy file on my own site for others to download?
Ask the creator before you post the file. The anoerone page says the clip is free for personal and commercial use with no attribution required. Send readers to the creator's download page instead of posting the file. Mirin's terms separately do not allow posting its files for others to download or giving them away in other collections.
Are the 3dicons animated?
We found that the 3dicons icons are still images, not animations. They are listed under CC0.
What does CC BY 4.0 ask me to do with the car model?
If you share the model, including in a changed form, you keep the creator's name, say that the model is licensed under CC BY 4.0 and link to the licence, and say if you changed it.
More reading
These two guides on this site cover other ways to animate.
- Higgsfield tutorial for animating a photo: it starts from a photo that you attach.
- Paper-cut animation guide with Claude and invideo: it starts from paper cutouts that you upload.
Sources and credits
- anoerone: Trophy Loop Animation Green Screen. The trophy clip is the creator's. No credit is required, and we credit it here anyway.
- ffmpeg.wasm playground
- Node.js download
- FFmpeg download
- Shotcut documentation: Chroma Key: Simple
- Pixabay Content License summary
- Mirin's Stock Footage terms
- Vecteezy gold coin clip by Rahmat
- 3dicons
- wide.video
- Khronos glTF Sample Assets: Car Concept and its LICENSE.md
- Creative Commons: CC BY 4.0 legal code
- HyperFrames on GitHub
Car model and textures: Eric Chadwick, Darmstadt Graphics Group GmbH, 2024, under CC BY 4.0. Our changes: patrol display materials, generic lettering, roof lights, two vehicle paths, and scene and camera animation. Third-party logo plates are hidden and no affiliation is implied.
Published · Updated