How to Screen Record With Audio on Mac (and Windows)

Short answer
Press Shift-Command-5, open Options, choose a microphone, click Record, then click Stop in the menu bar. For the Mac’s own sound, choose Include System Audio in macOS 27 Golden Gate or later.
On Windows, Xbox Game Bar records a game or app. Choose All under Capturing in its Settings for computer sounds. Windows key+Alt+R starts and stops recording; Windows key+Alt+M toggles the microphone.
Before you start
Decide whether you want your voice, the computer’s sound or both. Your voice comes through a microphone; system audio is what the computer plays. Pick the sound before recording a long walkthrough.
Our suggestion: close private messages and use a sample order instead of a real customer’s details. Keep a short outline beside you. At the end, play the saved file and listen before sharing it.
On a Mac: record with sound
The Screenshot app gives you screen controls and recording settings together. Start with the app or page you want to explain visible on screen.
Step 1: open Screenshot
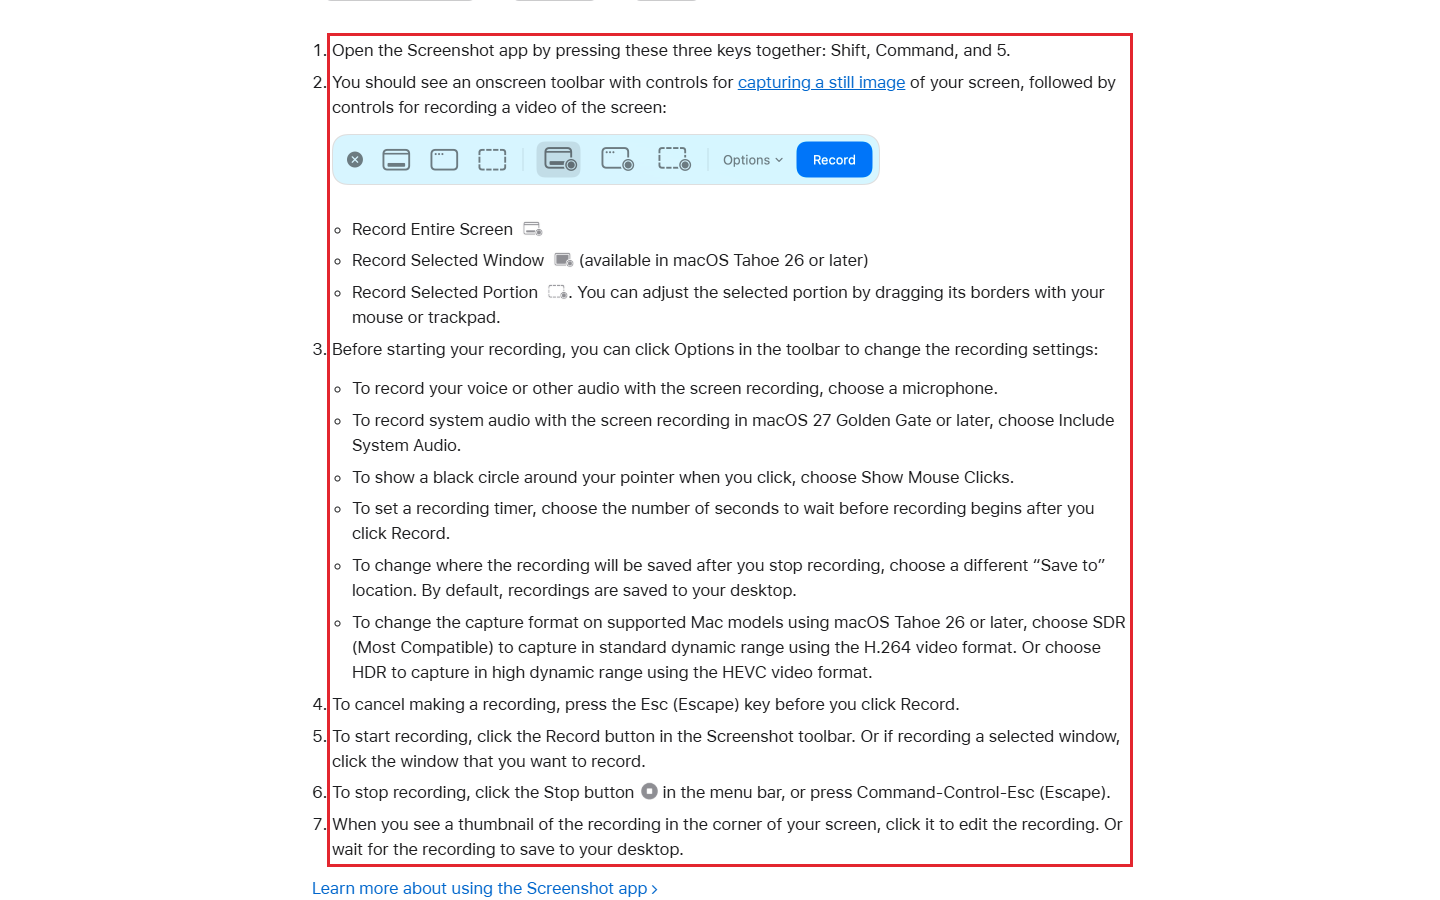
Press Shift, Command and 5 together. You should now see a toolbar with still-image controls followed by video-recording controls. Choose Record Entire Screen or Record Selected Portion. Drag the selected portion’s borders to adjust the area.
Record Selected Window is available in macOS Tahoe 26 or later. Select the recording area before moving on to the sound settings.
Step 2: open Options
Click Options in the toolbar before starting. This is where you choose recording settings. You can also choose a different Save to location. By default, recordings go to your desktop.
Show Mouse Clicks puts a black circle around the pointer when you click.
Step 3: choose a microphone
Choose a microphone to record your voice or other audio with the screen recording. For system audio, choose Include System Audio in macOS 27 Golden Gate or later.
Our suggestion: make a short sample and listen to it before the full take. Check your voice and any computer sound separately.
Step 4: click Record
Click Record in the Screenshot toolbar to begin. If recording a selected window, click the window you want to record. Move through the task in the same order as your outline.
If you change your mind before clicking Record, press Esc to cancel.
Step 5: stop and review
Click Stop in the menu bar, or press Command-Control-Esc. Click the thumbnail in the corner to edit, or wait for the file to save. The default location is the desktop.
Open the saved recording and listen from the beginning. Check that the voice is clear and the final action is included. If the file is awkward to send, see compressing a video.
- Press Shift-Command-5
- open Options
- choose a microphone
- click Record
- click Stop in the menu bar
If you do not see Include System Audio
Check the version first, then whether your Mac can upgrade.
- Open the Apple menu and choose About This Mac. The window shows the macOS name and version.
- Compare it with the requirement: Include System Audio is available in macOS 27 Golden Gate or later.
- Check Apple’s macOS compatibility information to see whether your Mac can upgrade.
- If a later macOS is compatible, use Software Update to download and install it.
Until then, choose a microphone in Options to record your voice with the screen.
On a Mac: QuickTime Player instead
Open QuickTime Player from Applications. Choose File, then New Screen Recording, or press Control-Command-N. If the Screenshot controls appear, follow the route above.
If the Screen Recording window appears, click the arrow beside Record and choose a microphone. To monitor the audio, adjust the volume slider. If you get feedback, lower the volume or use headphones with a microphone. After stopping, QuickTime opens the recording for playback, editing or sharing.
On Windows: Xbox Game Bar
Microsoft’s instructions apply to Windows 11 and Windows 10. They describe recording a game or app. Open the game or app you want to record before starting.
Enable Xbox Game Bar through Windows Settings: press Windows key+I and search for xbox. Then press Windows key+G to open its controls. In Settings, go to Capturing and select All to include computer sounds.
Microsoft’s keyboard route uses Tab to reach Settings, Enter to open it, then the Down arrow to reach Capturing. Tab to the All option and press Spacebar to select it. Windows key+G hides the controls.
Press Windows key+Alt+R to start recording. Windows key+Alt+M turns the microphone on or off during the recording. Press Windows key+Alt+R again to stop. The MP4 file is in Videos, then Captures.
| Route | How to start | Voice | Computer sound | Maker’s note |
|---|---|---|---|---|
| Mac Screenshot | Shift-Command-5 | Choose a microphone in Options | Include System Audio | System audio: macOS 27 Golden Gate or later |
| Mac QuickTime | File, New Screen Recording | Microphone choice beside Record in the Screen Recording window | Use Screenshot settings if its controls appear | For feedback, lower volume or use headphones with a microphone |
| Windows Xbox Game Bar | Windows key+Alt+R | Windows key+Alt+M toggles microphone | Settings, Capturing, All | Game or app; Windows 11 and Windows 10 |
Source: Apple and Microsoft, read 5 November 2026.
If the recording has no sound
Check permission for the recording app first, then the sound choice.
- Mac: open System Settings, then Privacy & Security. Click Screen & System Audio Recording and turn recording on for the app. You can allow both screen and audio, or just audio.
- Windows 11: open Start, Settings, Privacy & security, then Microphone under App permissions. Turn on Microphone access, Let apps access your microphone and, for desktop apps, Let desktop apps access your microphone.
- Windows 10: open Start, Settings, Privacy, then Microphone under App permissions. Turn on Microphone access for this device and Allow apps to access your microphone. For desktop apps, turn on Allow desktop apps to access your microphone.
Then review the controls for your recording route:
- On Mac, choose a microphone in Options for your voice.
- For Mac system audio, use Include System Audio in macOS 27 Golden Gate or later.
- In Game Bar, select All under Capturing for computer sounds and check the Windows key+Alt+M microphone toggle.
- For QuickTime feedback, lower the volume or use headphones with a microphone.
Some apps, such as Apple TV, might not let you record their windows. For distracting background sound, see removing background noise from video.
Our example: a bakery order-form video plan
Our example (illustrative, not a real client).
Crumb and Crust Bakery wants a staff walkthrough of its sample order form. The plan keeps the task and spoken explanation together.
- Task: a 2-minute sample cake order walkthrough.
- Computer and sound: Mac Screenshot with a microphone for voice.
- First take: a 10-second sample, then listen.
- File: choose Save to; desktop is the default.
- Share: review the saved recording before sending it to staff.
Copy this pre-recording checklist and fill in your choices:
Sound choice: microphone for voice; system audio if needed
macOS version: check About This Mac
Permission: allow the app in Screen & System Audio Recording
Sample take: record briefly, then listen
Save to: choose a location; desktop is the defaultFrequently asked questions
How do I record my voice on Mac?
Open Screenshot with Shift-Command-5, click Options and choose a microphone before recording.
How do I record the Mac’s system audio?
Choose Include System Audio in macOS 27 Golden Gate or later. That is the system-audio option Apple names in its screen-recording guide.
Where is the recording saved?
Mac Screenshot recordings go to the desktop by default, unless you change Save to. Game Bar recordings are MP4 files in Videos, then Captures.
Why is my screen recording silent?
Check the app’s recording permission and the selected sound source. On Mac, review Screen & System Audio Recording and the microphone in Options. For system audio, check the macOS version. On Windows, review microphone permissions, Capturing set to All and the microphone toggle.
Sources
Maker instructions read 5 November 2026.
Published · Updated